
Start Here: Unlocking the Advanced Panel
Before you can add any custom CSS or JavaScript to a Mago form, you need to know where those fields actually live — because they're hidden by default.
Inside the Form Configuration Wizard, scroll below the main form editor and click the Advanced link. This expands a section that reveals the CSS and JavaScript input fields.
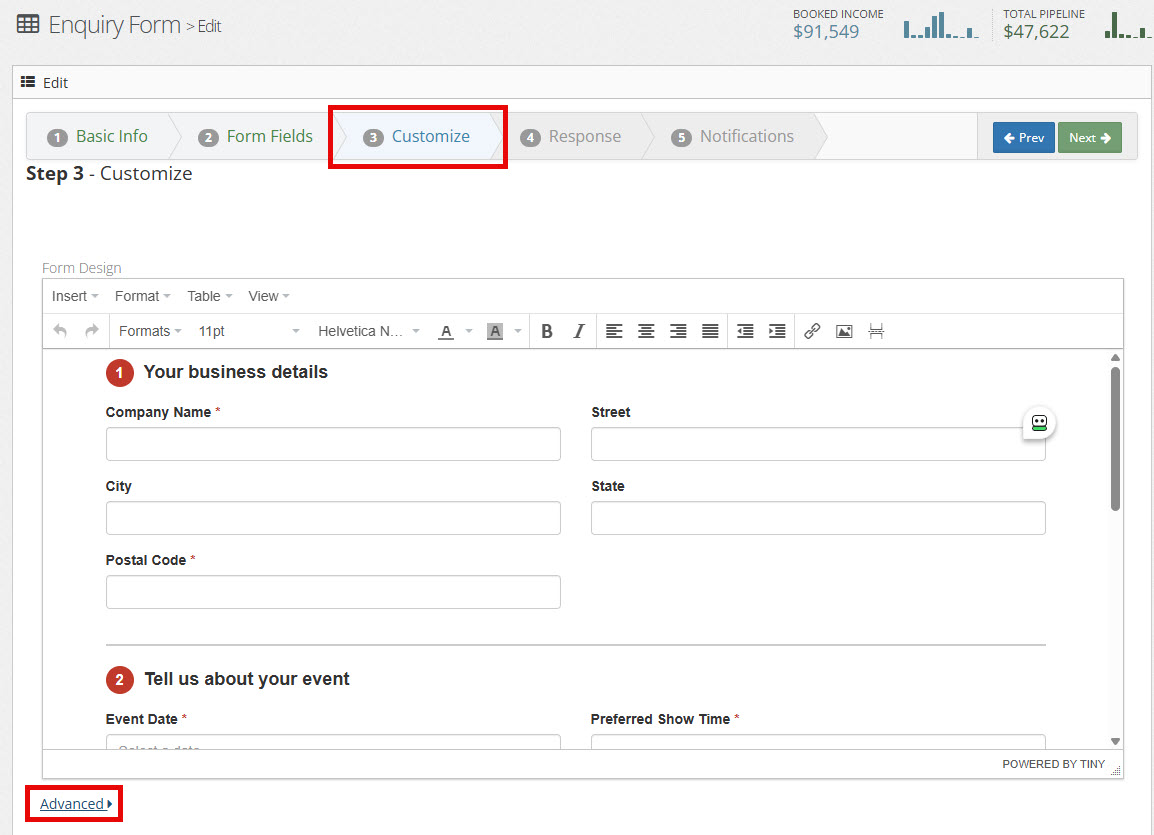
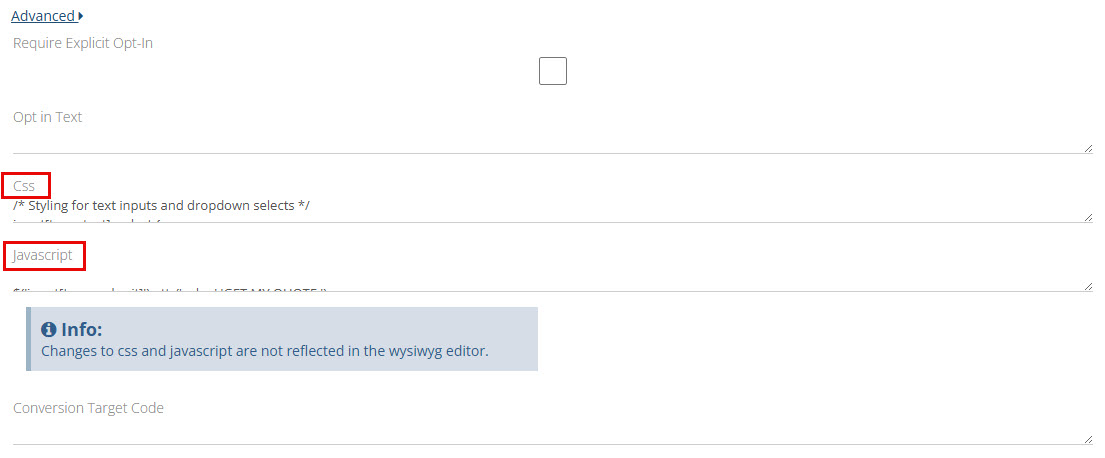
Changes made in the CSS and JavaScript fields are not reflected in the WYSIWYG editor preview. Always test your styles and scripts in the live or published form.
The Mago Form Editor
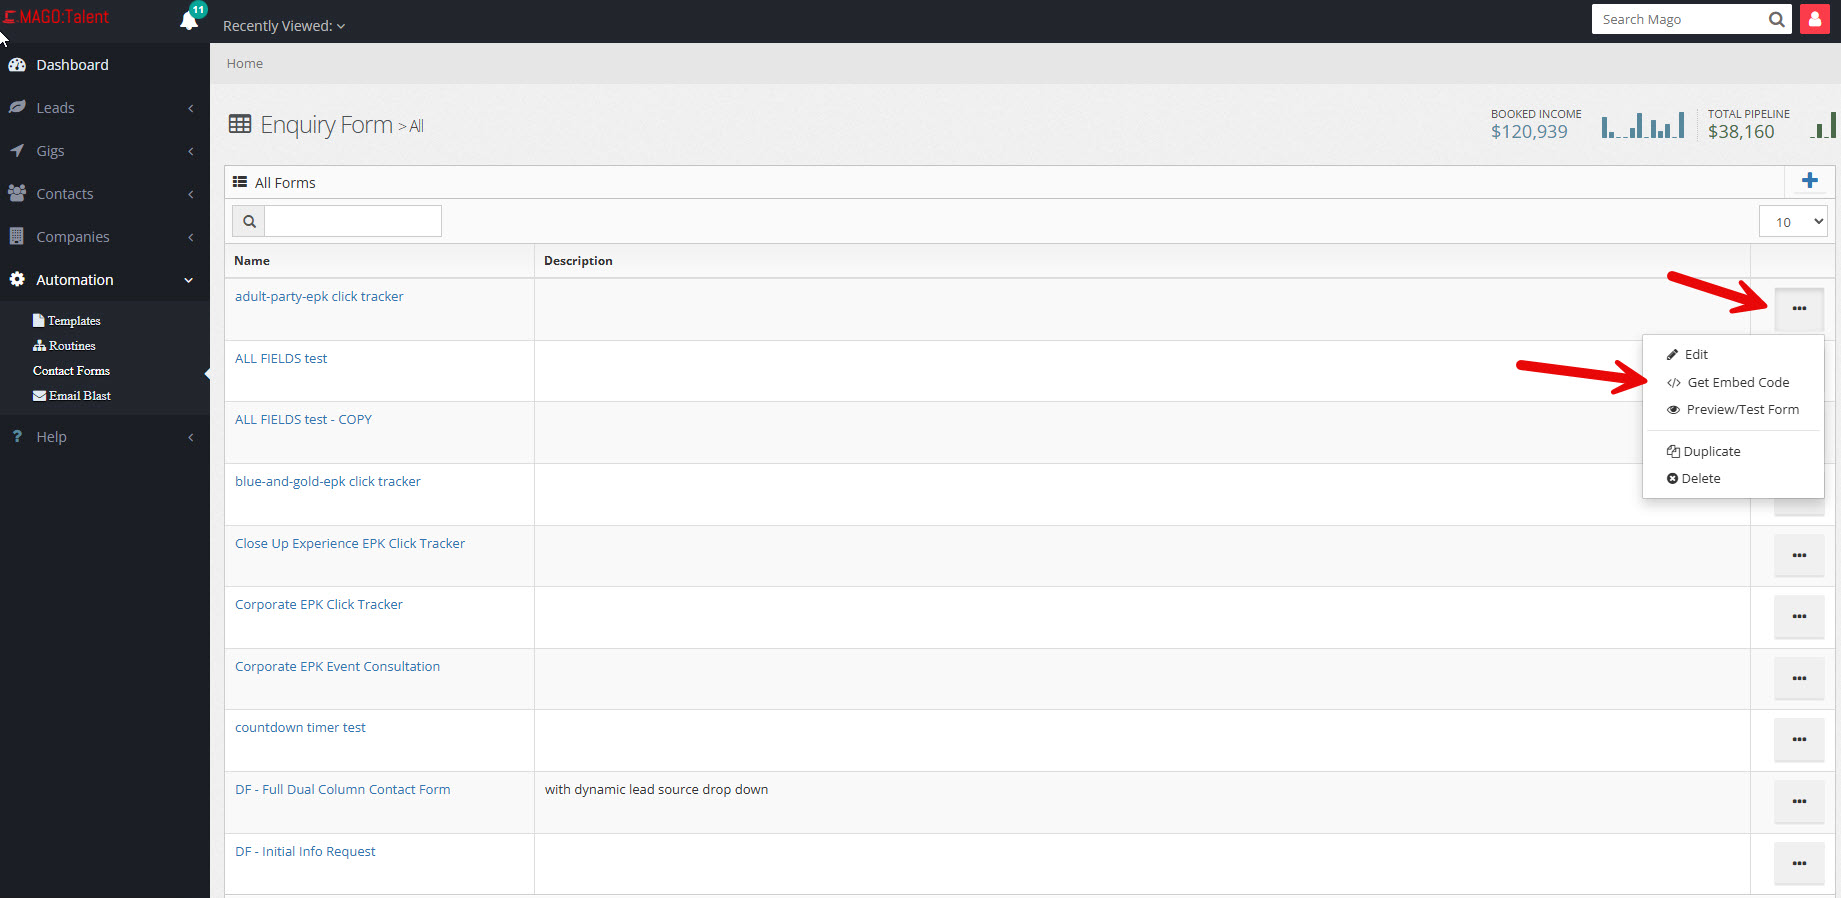
All form configuration happens inside the Mago form builder. Access your forms at https://mago.co/ContactForm. To edit a specific form directly (once you know its UUID): https://mago.co/ContactForm/Edit/UUID.
The form editor has four distinct input areas — keep content in the right place:
| Area | What Goes There |
|---|---|
| Form HTML | All visible and hidden form field markup |
| CSS | All form-scoped styles (access via Advanced panel) |
| JavaScript | All client-side JS that runs inside the form (access via Advanced panel) |
| Form Settings | Field toggles, form name, OptIn checkbox control, redirect URL |
Do not put CSS into the HTML block or JavaScript into the CSS block. These are processed differently by Mago and mixing them causes silent failures.
The Form HTML Block
The Form Field Picker
When building a new form, Mago offers a visual Form Field Picker where you drag fields into position. Once you confirm your selection, Mago automatically generates the Form HTML on the next step.
If you use the Form Field Picker after you've already written custom HTML, your custom HTML will be overwritten and regenerated to its default state. Custom CSS and JavaScript are not affected — only the HTML block is reset.
The Form Field Picker is optional. If you already have your own HTML, you can skip the picker entirely and paste your HTML directly into the Form HTML field. The picker is just a convenience for generating a starting point.
What Mago Adds Automatically
Mago wraps all form HTML in the following opening markup before rendering:
<div class="form-horizontal"><fieldset>It also injects the submit button automatically. Never include a submit button inside the Form HTML block. Style or rename it via CSS and JavaScript instead (see Section 11).
Opening Markup — The Legend Gotcha
Keep <div class="form-horizontal"><fieldset> at the top of your pasted HTML, but remove the <legend> tag. If a legend tag is present, it renders visibly on the form as an unwanted heading.
<div class="form-horizontal">
  <fieldset>
<legend>Contact Us</legend><div class="form-horizontal">
<fieldset>Required Fields
By default, only last name and email are required. To make any field required, add required="" to its input tag:
<input id="contactdateofperformance" class="form-control datepicker"
       name="contactdateofperformance" required="" type="text"
       placeholder="Select a date" />
Hidden Fields
Hidden fields must be placed inside the <fieldset>. Fields placed outside it are not submitted with the form. Paste them directly in the HTML editor — do not create hidden fields using Mago's visual field builder:
<input id="contactfield12" name="contactfield12" type="hidden" />⚠️ Forms Without a Show Type Do Not Create Leads
Mago distinguishes between a lead and a plain contact/opt-in based on whether a show type is present. If no contactshowtype value is submitted, Mago creates a contact record but does not create a lead.
The fix: add contactshowtype as a hidden field with a hardcoded UUID from https://mago.co/DropDown:
<div class="form-group">
  <label class="col-sm-3 control-label" for="contactshowtype"></label>
  <div class="col-sm-9">
    <input id="contactshowtype" class="form-control" name="contactshowtype"
           type="hidden" value="047234fa-1f65-4b92-9d02-494d587248a0" />
  </div>
</div>
Standard Field Wrapper Pattern
Mago uses Bootstrap 3-style markup. Standard single-column field:
<div class="form-group">
  <label class="col-sm-3 control-label" for="contactfieldname">Label Text</label>
  <div class="col-sm-9">
    <input id="contactfieldname" class="form-control" name="contactfieldname" type="text" />
  </div>
</div>
Full-width field (no label column):
<div class="form-group col-sm-12">
  <label class="control-label" for="contactfieldname">Label Text</label>
  <input id="contactfieldname" class="form-control" name="contactfieldname" type="text" />
</div>CSS — Location, Scope & Selectors
CSS goes in the CSS field inside the Advanced panel. It is scoped to the form's rendered output and won't affect the rest of the host page.
Core Selectors
| Element | Selector |
|---|---|
| Outermost form wrapper | .form-horizontal |
| Individual field group | .form-group |
| Text inputs, selects, textareas | .form-control |
| Labels | .control-label |
| Submit button | input[type="submit"] |
| Date picker input | .datepicker |
| Time picker widget popup | .bootstrap-timepicker-widget |
| Dropdown (select) | select.form-control |
Time Picker Fix (Always Include This)
If the form includes contactshowstarttime, always add this or the time picker will have layout issues:
.bootstrap-timepicker-widget table td input {
    padding: 0 !important;
    font-size: 14px !important;
}
Known CSS Gotchas
When field spacing looks wrong, the root cause is almost always the HTML wrapper structure — missing or extra col-sm-* divs, mismatched nesting. Trying to fix structural problems with CSS margins rarely works. Fix the HTML first.
Mago's embedded Bootstrap 3 stylesheet has high-specificity rules. Many overrides require !important. This is normal — not a sign of bad CSS.
If an unwanted checkbox appears on the form, it's Mago's built-in OptIn field. It cannot be removed with CSS — disable it in the Form Settings panel.
JavaScript — Location, Timing & Execution
JavaScript goes in the JavaScript field inside the Advanced panel. This JS executes inside the iframe where the form renders — it does not run on the host page. For logic that needs to run on the host page (e.g., passing URL parameters into the iframe), use a script block in the page's HTML editor.
The Async Rendering Problem
Mago loads its form asynchronously. The form DOM elements don't exist at script parse time — they're injected after the form loads. This means:
- Do not rely on
DOMContentLoadedalone - For any JS that interacts with form fields, you must poll for the element's existence before acting on it
- Poll for a specific named input ID, not for
fieldset(fieldset may exist before the actual inputs are ready)
var tryInit = setInterval(function () {
    if (document.getElementById('contactfield13')) {
        clearInterval(tryInit);
        initConditionalLogic();
    }
}, 100);
jQuery Is Available
jQuery is available in the Mago form context. You can use $(...) syntax directly in the JavaScript field.
The Embed Code — Two Methods
To get the embed code for any form, open it in the form editor and look for the embed/publish option.
Mago provides two embed options. Choose based on your context:
MagoForm JavaScript Embed
Simpler to drop in. Auto-resizes to fit content. Less reliable inside popups.
Best for: Standard inline page placement where the form is always visible on load.
iframe-form-loader Embed
Height must be set manually. More reliable in popups and modals. Required for URL parameter passing (GCLID, Smart Pages).
Best for: Divi popups, parameter injection, any context where form isn't visible on page load.
<script src="https://mago.co/Scripts/form.js" type="text/javascript"></script>
<script type="text/javascript">
var magoForm = new MagoForm();
magoForm.initialize({
    'formId': 'YOUR-FORM-UUID-HERE',
    'autoResize': true,
    'ssl': false
});
magoForm.display();
</script><script src="https://mago.co/Scripts/iframe-form-loader.js"></script>
<iframe id="magoFormIframe"
class="mago-form-container"
height="500px"
allowtransparency="true"
frameborder="0"
scrolling="no"
style="width: 100%; border: none; overflow: hidden;"
src="https://mago.co/MCF/Form/Publish/YOUR-FORM-UUID-HERE"
data-src="https://mago.co/MCF/Form/Publish/YOUR-FORM-UUID-HERE">
</iframe>When using the iframe method, always update both src and data-src when manipulating the iframe via JavaScript — or the loader will overwrite your change with the original URL. Also add id="magoFormIframe" manually if JS needs to reference it; Mago's default output doesn't include one.
The height you set for the iframe on desktop is rarely right for mobile. On smaller screens, form fields typically stack vertically and take up more vertical space than on desktop — which means a height that looks perfect on a laptop may clip the bottom of the form on a phone. Always test on an actual mobile device (or browser dev tools at 375px width) after setting your iframe height, and consider setting a taller height than you think you need as a buffer. Some builders also let you set a different height per device breakpoint — use that when available.
Platform-Specific Embedding Notes
WordPress with Divi (WPMU Dev Hosting)
Divi's editor converts window.location.search into a broken hyperlink on save. Always use bracket notation instead:
// ✗ WRONG — Divi breaks this on save
var loc = window.location.search;

// ✓ CORRECT — Divi-proof
var loc = window['location']['search'];The standard Google Ads auto-tagging parameter (?gclid=...) is stripped at the server level by many hosting providers — WPMU Dev is a known offender, but it's not the only one. If you're running Google Ads and your GCLID tracking isn't working, your host may be the culprit. The reliable workaround is to use a Google Ads tracking template that maps it to a custom parameter name: {lpurl}?gc_id={gclid} — then read gc_id in your JavaScript instead of gclid. This sidesteps whatever the host is filtering.
Wix / Squarespace / Other Platforms
Mago forms embed using an HTML/Embed block with the iframe code. Key notes:
- No Divi-specific issues apply
- Verify the platform's HTML block doesn't strip
<script>tags — some Wix and Squarespace blocks restrict script execution - The four-timing approach for parameter passing is still recommended as a defensive measure
System Dropdowns vs. Custom Field Dropdowns
This distinction matters a lot — mixing them up causes silent data loss.
Built-in Mago Fields
Options are managed in Mago's backend — you cannot add or rename options from the form HTML. Each <option> value must be its exact UUID from Mago's database.
Examples: contactshowtype, contactleadsource, contactaudiencetype, contactsalutation
contactfield* Fields
No UUIDs involved. Plain text values. You hand-code the entire input in the Form HTML block — Mago does not auto-generate markup for custom fields.
Can be any input type: select, radio, checkbox, textarea, etc.
If a dropdown choice is deleted from Mago's backend but the old UUID remains in the form HTML, submissions appear to succeed but the field is not saved. To diagnose, compare <option value="..."> UUIDs in your form HTML against current UUIDs at https://mago.co/DropDown.
<div class="form-group">
  <label class="col-sm-3 control-label" for="contactfield5">Your Label</label>
  <div class="col-sm-9">
    <select id="contactfield5" name="contactfield5" class="form-control">
      <option value="">-- Select --</option>
      <option value="Option A">Option A</option>
      <option value="Option B">Option B</option>
    </select>
  </div>
</div>Multi-Column Form Layouts
Mago's form uses Bootstrap 3's grid. To achieve a two-column layout, use col-sm-6 and group pairs of fields inside a shared .form-group:
<div class="form-group">
  <div class="col-sm-6">
    <label class="control-label" for="contactfirstname">First Name</label>
    <input id="contactfirstname" class="form-control" name="contactfirstname" type="text" />
  </div>
  <div class="col-sm-6">
    <label class="control-label" for="contactlastname">Last Name</label>
    <input id="contactlastname" class="form-control" name="contactlastname" type="text" />
  </div>
</div>Don't use CSS Grid or Flexbox as the primary column layout mechanism. Mago's stylesheet is built around Bootstrap 3's float-based grid, and mixing layout systems causes unpredictable rendering.
Multi-Step Forms
Mago supports multi-step forms natively — no WordPress plugin required. Steps are implemented using visibility-toggling JavaScript. There is no native Mago UI for step configuration; it's done in the Form HTML and JavaScript fields.
- Wrap each step's fields in a named container:
<div id="step-1">,<div id="step-2">, etc. - Use JavaScript to show/hide step containers and manage a current-step variable
- The submit button is always on the final step — it's injected by Mago and cannot be moved or duplicated
- "Next" and "Back" buttons must be
<button type="button">elements (nottype="submit") — they trigger JS navigation only - Per-step validation must be written manually in JavaScript — Mago only validates on final form submission
Multi-Site / Multi-Form Notification Routing
There's no native Mago feature to automatically identify which form or website generated a submission. But there are two solid approaches:
Duplicate the Form & Notification
Duplicate the form for each website location. Then duplicate the notification email for each form and update the notification subject or body to identify which form and site it came from.
Best for: Most performers. Simple to set up, easy to maintain.
One Form + Hidden Source Field
Use a single form, but each embed location gets its own version of the embed code with a different hardcoded value in a hidden contactfield* input identifying the source page or site.
Best for: When you want one form to manage but need to track submission origin in the CRM record.
<!-- Embed on your corporate site -->
<input id="contactfield8" name="contactfield8" type="hidden" value="Corporate Site - Contact Page" />

<!-- Embed on your kids/family site (same form, different hidden value) -->
<input id="contactfield8" name="contactfield8" type="hidden" value="Family Site - Contact Page" />
The submitted value then appears in the contact/lead record in Mago and can be used in notification templates, automations, and workflow routing.
Submit Button Customization
Mago injects the submit button automatically — you cannot change its label text from the Form HTML block. Use the JavaScript field to rename it and the CSS field to style it.
Rename the Button Label
$('input[type=submit]').attr('value', 'REQUEST BOOKING')Style the Button
input[type=submit] {
    background-color: #EC1C24;
    color: white;
    border-radius: 4px;
    padding: 12px 30px;
    font-size: 16px;
    font-weight: bold;
    cursor: pointer;
}
Use an Image as the Button
#ContactForm .btn {
    width: 335px;
    background: url('https://example.com/your-button-image.png');
    height: 120px;
    font-size: 0;      /* hides button text */
    border: none;
}Redirect & Thank-You Page
Step 4 of the Form Configuration Wizard (Response) controls what happens after submission. The recommended approach is a Redirect URL — enter only the clean base URL. Mago automatically appends ?targetId=UUID:
https://example.com/thank-you/https://example.com/thank-you/
?targetId=ff9618f3-...Each form can only redirect to a single thank-you URL. There is no built-in way to redirect to different URLs based on submission values. If you need different destinations for different event types, use separate forms.
GCLID / Google Ads Tracking
- Create a custom field in Mago Settings → Custom Fields (e.g., "GCLID") and note the assigned field ID (e.g.,
contactfield12) - Add the hidden input inside
<fieldset>in the Form HTML block - The JS that reads the URL parameter and populates the field goes in the Mago JS field
- The JS that appends the parameter to the iframe src goes on the host page
- On WPMU Dev hosting (and many other hosts), use
gc_idas the parameter name (notgclid) and set a Google Ads tracking template:{lpurl}?gc_id={gclid}
Quick Field Name Reference
| Field ID | Purpose |
|---|---|
contactfirstname | First name |
contactlastname | Last name |
contactemail | Email address |
contactmobilephone | Mobile phone |
contactdateofperformance | Event date (datepicker) |
contactshowstarttime | Show start time (timepicker) |
contactshowtype | Show type — system dropdown, requires UUID values |
contactleadsource | Lead source — system dropdown, requires UUID values |
contactaudiencetype | Audience type — system dropdown, requires UUID values |
contactsalutation | Salutation (Bride, Groom, Parent, etc.) — system dropdown |
contactvenueaddress | Venue/party location address |
contactcommentforclienttosee | Comments — always label as "Your Comments" |
contactfield1 – contactfield* | Custom fields — IDs assigned sequentially in Mago Settings → Custom Fields |
To view and modify all system labels and custom field definitions — including renaming fields, adding options, and finding field IDs — go to https://mago.co/Business/EditLabels.
Complete Gotcha Reference
| Issue | Root Cause | Fix |
|---|---|---|
| gclid disappears from URL | Many hosts strip it at the server level (not just WPMU Dev) | Use gc_id via tracking template {lpurl}?gc_id={gclid} |
| window.location.search broken in Divi | Divi converts it to a hyperlink on save | Use window['location']['search'] bracket notation |
| JS runs before form fields exist | Mago form loads asynchronously | Poll for a specific field ID using setInterval before initializing |
| Divi popup not receiving URL parameters | Popup DOM doesn't exist at page load | Use four-timing approach: immediate + DOMContentLoaded + 500ms + 1500ms |
| Divi popup not updating after code change | Aggressive Divi popup caching | Create a new popup rather than editing the existing one |
| OptIn checkbox appearing on form | Mago's built-in OptIn field is enabled | Disable it in Form Settings panel — not via CSS |
| JS breaks silently after copy-paste | Divi introduced broken hyperlink syntax | Inspect pasted code for [window.location.search](http://...) and correct it |
| JS works sometimes, fails others | Hummingbird asset optimization mangling JS | Disable Hummingbird asset optimization for that page |
| Hidden field value never reaches CRM | Hidden input placed outside <fieldset> | Move hidden input inside <fieldset> in Form HTML |
| Legend heading visible on rendered form | <legend> tag left in Form HTML | Remove <legend> — keep <div class="form-horizontal"><fieldset> only |
| Submit button appears twice | Submit button added to Form HTML | Never add a submit button to Form HTML — Mago injects it automatically |
| Form submission creates contact but no lead | No contactshowtype value submitted | Add contactshowtype as a hidden field with the correct show type UUID |
| Thank-you redirect URL is malformed | ?targetId=... was included in the Redirect URL field | Enter only the clean base URL — Mago appends ?targetId=UUID automatically |
| Dropdown submits but data doesn't save | Option value has wrong or stale UUID | Compare option values against current UUIDs at https://mago.co/DropDown |
| Button label text can't be changed in HTML | Mago injects the button — it's not in Form HTML | Use JS field: $('input[type=submit]').attr('value', 'YOUR TEXT') |
| CSS/JS fields not visible in form editor | Hidden behind the Advanced toggle | Click the Advanced link in the Form Configuration Wizard |
| Custom HTML overwritten unexpectedly | Form Field Picker was used after custom HTML was written | Avoid using the Field Picker once you've written custom HTML — paste HTML directly |
| Layout spacing wrong despite CSS fix | Structural wrapper mismatch in HTML | Fix the HTML structure (col-sm-* divs) — CSS margins won't compensate |
| Time picker widget has display issues | Bootstrap timepicker padding bug | Always include the time picker CSS fix when contactshowstarttime is present |